Showing posts with label tutorial. Show all posts

Cat Stand Under the Cup


For work you will need:
- Alaska yarn from the manufacturer Nako gray;
- Yarn;
Acrylic is white and pink;
- hook number 2;
- a pair of peepholes (black half-beads);
- ornaments (bow);
- some felts.
And the ability to crochet ovals, circles and triangles. There are no schemes. In fact, everything is very simple - only 17 pieces. And a little imagination.

We knit the workpiece. We will need:
1 circle - the body (connected to the CER 4 rows in a circle, the thread is gray)
2 ovals - the head (4 rows of RLS, 1 row of SSNs are connected in a circle, the thread is gray)
1 oval - muzzle (4 rows of RLS are connected in a circle, the thread is white)
2 triangles - eyelet (1 row connected - 2CON, 1CC2H, 2CN into one loop, 2 rows of RLS gray thread)
2 triangles - the inner part of the ear (dial 6 in, knit, subtracting on the sides, pink thread)
4 paws - (knit as half of the oval, RLS 2 rows back and forth, thread gray). Front slightly longer than the rear. On the front dialed 8 in, on the back 6 in.).
4 cushions on the feet - (2 circles 10 SSS in ka, 2 semicircle 8 SSS in one loop)
1 tail - get the desired length from the inside of me 15. To twist the tail, tie it in a zigzag. In one place lower 3 loops, in the other make an increase from 3 loops.


Sew pads to the paws and pink triangles to the ears, the tip of the tail embroidered with white thread.

Tie the two ovals of the head, inserting the ears between them. Fill with sinter and distribute the remainder.

To issue a muzzle. Sew a white part, lightly fill it with sinters. Slightly pull the muzzle down the center, embroider your mustache and nose. Glue the eyes.

Head, front legs and body tie in one step. Hind legs and a tail also tied a crochet.
Decorate your cat with a bow, or as fantasy tells.
A perfect gift for friends and family is ready!

Little Rainbow Elephant Free Pattern

Little Rainbow Elephant Free Pattern


Little Rainbow Elephant

My height is about 8-9 cm. 
-Acrylic (100g-275 m) 
-Hook № 3. 
-Wire (thickness approx. 2.5 mm) 13cm, 
-4 pcs. Straight pins-needle with bead on the end, 
-A little white wool for felting (eyes), 
-2 Beads for eyes. 
-You can still cook the remaining yarn for strips, if you want to tie the elephant with strips. 
Symbol: 
X-Column without a scale 
V-Add 
A-Ubava 
(...) *?-allocated in Skockas to perform so many times 
[...] -Number of columns in a row 

Torso (Body head))) 

1series B "Amaguumi ring" 6x[6] 
2row 6V [12] 
3row (x V) * 6 [18] 
4th row (2x V) * 6 [24] 
5th row (3x V) * 6 [30] 
6th row (4x V) * 6 [36] 
7th row (5x V) * 6 [42] 
8-17 series 42X [42]-10 rows. In these rows I knit stripes (in this case 7 colors of the Rainbow) 
18th row (5x a) * 6 [36] 
19th Row (4x a) * 6 [30] 
20th row (3x a) * 6 [24] 
21th Row 24x] 
22row (2x a) * 6 [18] 
Fill the torso. 
23-24 series of 18x [18]-2 rows 
25th Row (4x a) * 3 [15] 
26-27 series of 15x [15]-2 rows 
28th Row (3x a) * 3 [12] 
29-31 series 12x [12]-3row 
Fill the base of the trunk 
32 Series (2x a) * 3 [9] 
33-36 Series 9x [9]-4 rows 
Insert Wire. and knit pulling periodically knitting, whatever it was going to tension. 
37 series (X a) * 3 [6] 
38-42 series of 6x [6]-5 rows 
43 series (X a) * 2 [4] This range should go already over the wire. 
44-47 Series 4x[4] 
Cut the thread, pull the hole and fasten the thread. 
Attach the shape of a trunk. 

Ears (2 Detki) 

Symbol: 
V-In the column of the previous row of 3 

1series B "Amaguumi ring" 3х [3] 
2row 3x[3] 
3row x V x [5] 
4th row 5x[5] 
5th row 2x V 2х [7] 
6th Row 7x] 
7th Row 3x V 3x [9] 
8th Row 9x] 
9th row 4x V 4x [11] 
10th Row 11x] 
Leave the tip of the thread 20cm 
Legs (4 details) 

1series B "Amaguumi ring" 6x [6] 
2-6 series 6x [6]-5 rows 
Leave the tip of the thread 20cm 

Legs fill, insert in them pins-needles. 
Put glue on the tip of the pin and stick to the place in the torso. 
The legs are nailed. The tip of the thread is deduced to the beginning of knitting trunk. 
Sewing the ears and also output the strings))) 

From the tips of the thread braid the desired length of the braid and get the tail! 

Attach the eyes to the eye 
Draw a blush. Embroider the mouth and the Boki. 

and!!! The Elephant is ready!!! 
Continue to decorate your own taste:)

Crochet Criss Cross Spa Slippers Free Crochet Pattern – Video

If you love to crochet some house slippers for your family, you will love to check out Crochet Women Slippers Shoe Patterns Round-Up. Today we are going to share fabulous house slippers from the t-shirt yarns. Remember the Fabulous DIY Ways to Recycle Old T-Shirts yarns? You can make your own t-shirt yarn by cutting old tee into thin straps, or purchase t-shirt ribbon yarns of any color online. And you will love this most comfortable slippers you can make out of old t-shirts with double soles. You can also add some appliques and other accessories. Thanks to the author for the tutorial and for beautiful design. You can crochet these slippers for the whole family and it’s sturdy and easy to slip on.


Leaf Stitch Crochet Pattern - Tutorial

Learning new crochet stitches is always a fun way to get inspired to create new crochet patterns. The crochet stitch I’m showing you today is one of the most particular ones.


The leaf stitch is just wonderful and very easy to learn. It is perfect for making elegant crochet skirts, cardigans, ponchos, and any other dresses.

As you may see from the photos below, this crochet stitch has a lot of relief, which makes this pattern even more unique.


Start making your crochet projects using the leaf stitch. Be creative, you can customize it and create a new crochet stitch all by yourself.

This pattern is really easy to understand. The video tutorial below will give you all the instructions on how to make the lovely leaf stitch.


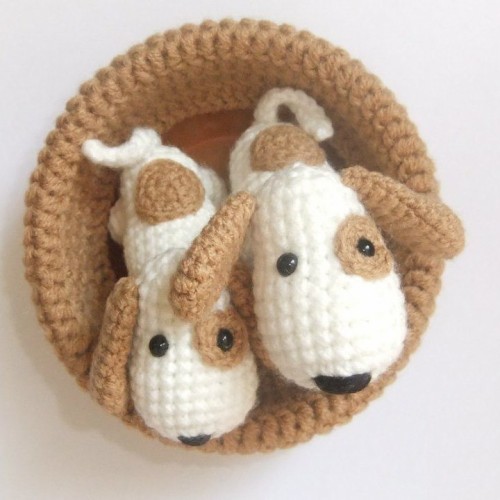
Crochet Toy Little Dog Free Amigurumi Pattern

Crochet Toy Little Dog Free Amigurumi Pattern

Designed by Evgeniia Kokina.


Abbreviations:
mc = magic circle
ch = chain
sc = single crochet
inc = 2 sc in the next stitch
dec = single crochet 2 stitches together
F.o. = finish off
( ) = number of stitches you should have at the end of the round/row
( )* 6 = repeat whatever is between the brackets the number of times stated

Little dog free amigurumi pattern

1: mc with 6 st (6)
2: inc x 6 (12)
3: (1 sc, inc) x 6 (18)
4: (2 sc, inc) x 6 (24)
5-8: 24 sc (24)
9: (6 sc, dec) x 3 (21)
10: 21 sc (21)
11: (5 sc, dec) x 3 (18)
12-14: 18 sc (18)
15: (1 sc, dec) x 6 (12)
Stuff the head.
16: dec x 6 (6)
F.o., leaving a tail for sewing.

1: mc with 6 st (6)
2: inc x 6 (12)
3: (1 sc, inc) x 6 (18)
4: (2 sc, inc) x 6 (24)
5-9: 24 sc (24)
10: (6 sc, dec) x 3 (21)
11: (5 sc, dec) x 3 (18)
12-15: 18 sc (18)
16: (1 sc, dec) x 6 (12)
Stuff the body.
17: dec x 6 (6)
F.o., cut the yarn.
Arms (make 2)
1: mc with 5 st (5)
2: inc x 5 (10)
3-5: 10 sc
6: only 5 sc
F.o., cut the yarn.

(make 2)
1: mc with 5 st (5)
2: inc x 5 (10)
3-4: 10 sc
5: only 5 sc
F.o., cut the yarn.

1: 12 ch
2: sc in 2nd ch from hook and in each ch across.

(make 2)
With brown yarn:
1: mc with 6 st (6)
2: inc x 6 (12)
3: (3 sc, inc) x 3 (15)
4-5: 15 sc
6: (3 sc, dec) x 3 (12)
7-8: 12 sc (12)
9: (2 sc, dec) x 3 (9)
10: 9 sc
11: 1 sc, 4 dec (5)

Spot near eye area
1: mc with 6 st (6)
2: (1 sc, inc) x 3 (9)

Spot at the back
1: mc with 6 st (6)
2: inc x 6 (12)
3: (1 sc, inc) x 6 (18)
MeasureMeasure

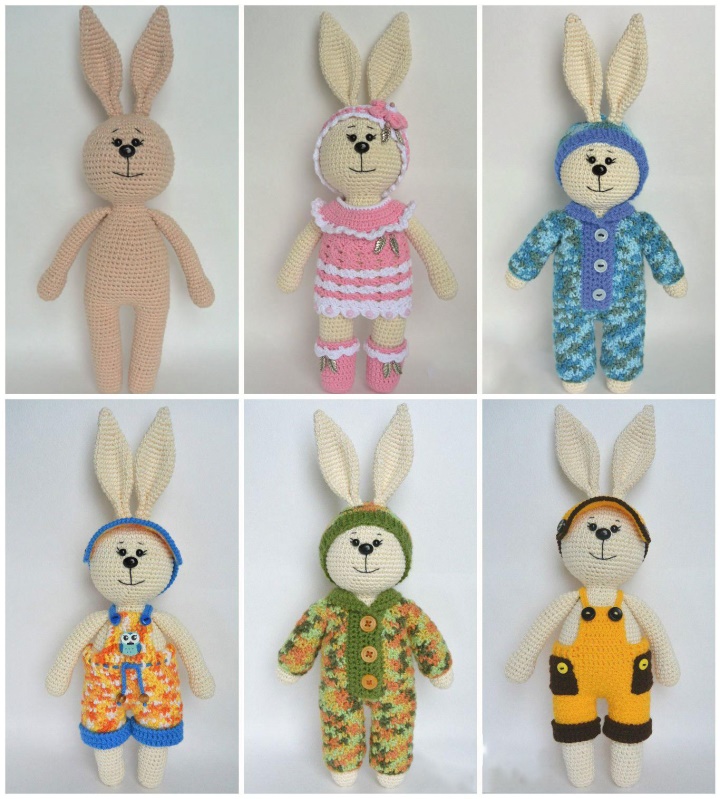
Amigurumi Bunny Tutorial

Amigurumi Bunny Tutorial
Amigurumi Bunny
Rabbit Latta. Master Class.
Hello to everyone who looked at this page! Want
invite you to tie such a rabbit, without clothes, for now, only the very basics.
The height of the hair along with the ears is about 30 centimeters.
Unfortunately, at the moment there are no these toys, so a fresh photo of the hair without
I can not make clothes, but there is a photo of the very first hare I knitted for
his daughter, but from another yarn, darker, I attach it for clarity.

For a hare, we need:
* Coco Vita Sharm yarn color # 4153 dairy 106m / 50g, or any other
a yarn that looks like this.
* Hook No. 1.6. You can use the number 2, the main thing is that the knitting is tight.
* Filler. I'm using the holofiber balls.
• Eyes, spout - at your discretion. I had a pair of peepholes 6 mm on the stalk and
spout 12 * 8 mm.
* Good mood =)
Legend:
* sbn - column without crochet
* pr - increase: in one loop, tie 2 sbn
* уб - reduction: to bind together 2сбн
* (1 сбн, пр) * 6 - repeat what is indicated in parentheses 6 times
* Stuff the toy as you knit, especially tightly around your neck.
Head.
1. 6 сбн кольцо / Amigurumi
2. pr * 6 = 12
3. (1 sb, pr) * 6 = 18
4. (2 sb, pr) * 6 = 24
5. (3 sb, pr) * 6 = 30
6. (4 sb, pr) * 6 = 36
7. (5 sb, pr) * 6 = 42
8. (6 сбн, пр) * 6 = 48
9. (7 sb, pr) * 6 = 54
10. (8 sb, pr) * 6 = 60
11-16. 60 sbn (6 rows)
17. (8 сбн, уб) * 6 = 54
18. (7 sb, yb) * 6 = 48
19. (6 сбн, уб) * 6 = 42
20. (5 сбн, уб) * 6 = 36
21. (4 сбн, уб) * 6 = 30
22. (3 sb, yb) * 6 = 24
23. (2 сбн, уб) * 6 = 18
* If desired, the head can be made separately from the body and then simply sew them.
To do this, completely connect the head, fix the thread and start knitting the body:
1. dial 18 air loops, connect them to the ring (or first dial 6 sb in
ring amigurumi, then tie a series of increases (12 sb will be obtained), and another series
according to the scheme: (1сбн, пр) * 6, to make 18 loops.)
2-3. 18 sbn (2 rows)
And then we continue to knit the body from the 26th row, and so on.
So the head will hold better, stronger, but I did not do, the threads are plump,
knitting tight, stuffed too very tightly, for 2 years of operation, so let's say,
the toy is still alive =) In general, I put around the options for knitting the head-body, who like
will want - let it be so, how much easier it is. *
24-25. 18 sb (2 rows) is the neck
Then we continue to knit the body.
26. (2 sb, pr) * 6 = 24
27. (3 sb, pr) * 6 = 30
28-29. 30 sb (2 rows)
30. (4 sb, pr) * 6 = 36
31-32. 36 sbn (2 rows)
33. (5 sb, pr) * 6 = 42
34-35. 42 sbn
36. (6 сбн, пр) * 6 = 48
37-48. 48 sbn (12 rows)
Next, we divide the knitting into the legs: put the marker where the knitting was finished,
we sew 20 sbn, we fold in half, we sew 4 connecting loops
(the first connecting loop in the loop marked with a marker). It turned out 2
the same hole for the legs, each should have 20 loops. Every
Knit the knit separately.
Feet. 2 items.
1-16. 20 sbn (16 rows)
17. (8 сбн, уб) * 2 = 18 сбн
18-22. 18 sbn (5 rows)
23. (2 сбн, уб) * 6 = 12
24. (1 сбн, уб) * 6 = 6
Pull off the hole, fix the thread.
Pens. 2 items.
1. 6 сбн кольцо / Amigurumi
2. pr * 6 = 12
3. (2 sb, pr) * 4 = 16
4-7. 16 sbn (4 rows)
8. (2 сбн, уб) * 4 = 12
9-29. 12 сбн (21 row)
* The upper 1/3 of the handle is not tight.
Sew in two. Subsequently, when we attach the handles to the body, they will move
only up and down.
* Or, without tying the last row, make 6 adjustments and fix the thread, then
The handles will have a rounded shape at the top, and we can attach them to the thread
so that they move in all directions. *
Ears. 2 items.
1. 5 sb in the ring amigurumi
2. pr * 5 = 10 sb
3-4. 10 sb (2 rows)
5. (1 sb, pr) * 5 = 15
6-7. 15 sbn (2 rows)
8. (1 сбн, пр) * 7, 1 сбн = 22 сбн
9-13. 22 sbn (5 rows)
14. (9 сбн, уб) * 2 = 20 сбн
15-16. 20 sbn (2 rows)
17. (8 сбн, уб) * 2 = 18
18. 18 sbn
19. (7 сбн, уб) * 2 = 16
20. 16 sbn
21. (6 сбн, уб) * 2 = 14
22-23. 14 сбн
Fold the bottom of the ears in half and sew
together the last 4 rows, sew
ears to the head.
Tail (optional).
1. 6 sb in the ring amigurumi
2. pr * 6 = 12
3. (3 sb, pr) * 3 = 15
4. 15 sbn
Sew a tail to the body.
Sew all the details together. We make the muzzle of the hare at will.
Later, probably, I'll write MK for some clothes. Look to me at
Fair Masters, in the VC or Classmates, there will periodically appear
master classes and new works.
And finally, more options for clothes for bunnies:


How to make money Crocheting


I have a degree in Marketing and Communications, I am not saying that I am an expert but I have learned a few lessons along the way to get where I am today.  In December I quit my office job to become a full time fiber artisan.  I make money crocheting.  Not enough to retire on, but enough to pay for groceries.  :)

So here are a few pointers so that you can skip learning the hard way and start selling your crochet items right away.

First you need to start with the 4 P's of marketing: Product, Price, Place and Promotion.

Let's start with your product.  What are you going to make?  What are you good at making?  I started with making scarves and hats.  I made a ton of hats, some special order and a lot for craft shows.  Hats drove me crazy!  Customers were so picky about hats- it drove me nuts.  At craft fairs so many people would try on the hats that I got worried about lice and even a few of them were stolen because I would be busy helping one customer and someone asking to try one on and would walk away with my item on their head.  I did not want to make any more hats.  

I knew that wasn't my thing, so I kept creating until I found what I liked to make and wear.  I choose to use higher end yarn and make more elegant items that I have designed myself.  I did not want to compete with the Grandmas and their dishcloths and baby hats.  I wanted to be different.
Discover what you like to do, do it well and make it unique.

Discover what you like to do, do it well and make it unique.

Your Business Name
I started with another name and it just wasn't fitted to what I create.  So I thought a lot and asked a few people and came up with Living Skies Crochet.  Why that name?  I live in Saskatchewan, Canada.  Saskatchewan is called the Land of the Living Skies due to our huge skies, Northern Lights displays and amazing sunsets.  Saskatchewan has winter for at least six months of the year, that is a lot of time to wear crocheted items.  Because I chose a name that reflects where I live I have received a lot of press coverage, lots of local sales and even worldwide sales because they think Saskatchewan is exotic for crochet designing.  My name change has increased my sales and exposure exponentially.

When choosing a name be sure to google it.  You do not want to be the 500th Happy Hooker shop.  Find something that is unique, ask for help.  Don't worry it will come; until then keep creating you have a shop to fill.

After you have your name, create a logo and use the same one everywhere.  Facebook, your website, Etsy, Ravelry keep it consistent.

Price
I am really frustrated with people undervaluing their items.  Just because you are sitting watching TV when you are crocheting items does not mean that your time should not be figured into the cost.

Your work is hand-made and unique, customers will recognize the quality and be willing to pay for it.

Don't undervalue it or you will be crocheting like a mad woman trying to keep up to orders and you will feel like you are not making any money.

I probably charge more than most, but after people feel the quality of the yarn and see the handmade quality of the item I have no problem with purchases.

Place
This has lots of variables.

I have attended a lot of craft shows and farmers markets.  This is where you need to be careful and plan well.  The majority that I have attended in the past have been a waste of time and money.

What to consider: who are your buyers (this will depend on your prices), who is your competition, what advertising does the sale do?  If you have never heard of the sale before, most likely no one else has either.  There is nothing worse than sitting there all day with no customers.  Be over prepared and have the best looking booth.  Customers will decide if they will look at your merchandise because of their first impression of your booth.  I created a board on Pinterest that has a lot of great ideas.  Click on it and check it out.
Follow Carolyn Carleton's board Craft show Ideas on Pinterest.
Living Skies Crochet Evergreen Artisan Market
I did not want to waste my time on a table at yet another craft fair but I didn't want to spend hundreds on a booth at a big show. So I compromised and paid $60 for a booth at a local Christmas Artisan Market.  This is a juried show and because I sell higher end items I thought this would be a perfect fit.  I advertised on Facebook and my website that I would be there and where I would be located and it was my best sale ever!  The market was open Friday from 4-9 and Saturday 10-5 and I made $1,000.  

After Friday night I had sold out of my Madison Necklace design and Gwendolyn Cowl, I had no idea what a big hit they would be.  I stayed up till 2am to make more for the next day.  All day Saturday I crocheted while I was at my table, I was selling them before I had them made. My table was practically sold out by 2pm.  

**All it took was figuring out what I am selling and doing it well in the right location.  That market continues to give me sales and people still call and ask for items.  I can't wait to see what happens this year!

I have also done Farmers Markets, you can read about my experience here:  http://www.livingskiescrochet.com/blog/-what-i-learned-at-the-farmers-market

A website: I have been a website designer in the past and I now only use Weebly.  It is so easy!  All you do is pick a template and click and drag boxes where you want add text, pictures, forms, video, you name it.  The free version gives you what you need.  I highly recommend it, I have designed 7 websites using it and I do not know anything easier.

Social Media: Facebook is a must, it is how you can keep in contact your customers and showcase new items.  Remember your crochet business is a page not a person or a group.  

Twitter is something that I haven't spent a lot of time on.  I haven't seen much return using it, I have it linked with Facebook and Instagram but I usually just get people trying to sell me something.  

Instagram has worked for a lot of people, my friend Becky grew her leather cuff business through her blog and Instagram.  It has been incredible to watch - you can purchase custom leather cuffs from so many people on Etsy and at a cheaper price but Becky's sales continue to grow.  Why?  Because via social media her customers are connecting with her and therefore want something that her hands have created.  Becky also spends a lot of time praying for her business and listening to God for direction.  Being grounded is a good place to be.

With all social media it is something that you have to invest time in and you have to keep posting.  Facebook pages makes it easy with scheduled postings.  You can sit down for 10 minutes and create a full week of Facebook posts.  (I teach a full hour class on just this subject.)

Another avenue that has worked for me is selling via consignment.  I do not need to sit anywhere for hours, other people sell my items for me.  Win, Win!  Again going back to choosing the right name, I now sell at Tourism gift shops because of my Saskatchewan themed name.

Etsy: My Etsy shop is mainly where I sell my patterns, and I am fine with that.  Shipping from Canada is so expensive that I usually loose money when I ship a finished item.  If you are going to have an Etsy shop you need to have merchandise.  Fill it up!  Make sure you have used all your tags when you are listing.  Have a great description and watch your stats.  When are people looking, what keywords are they using to find your item.  Build on those.  If you see that one item is getting more visits than others make that item in a variety of colors.

If you want to start an Etsy shop, CLICK HERE and receive your first 40 listings for free!

Ravelry- I love to design crochet patterns, Ravelry gives me the option to either sell or offer my patterns for free.  It is a great place to hang out with fellow fiber artisans.  Anyone involved in this craft should be hanging out on Ravelry.

Promotion
This is where you spend your money wisely.  One of the best investments I made in this area is my mannequin for $80 from Winners.  I have a friend that will come and be my model and all she requires for payment is a free item or two.  But my mannequin in always ready for a picture.  I use it for product shots (great shot = more sales on Etsy and Ravelry) and it is great for driving traffic to my table at craft shows.  At craft shows I change the item on the mannequin often but usually whatever the mannequin is wearing sells faster (especially if the item is blue, a little something that I have noticed).

Watermark all your pictures, I use Picasa or PicMonkey.  This way if someone likes your item so much and they want to steal your picture your name is on it.

Facebook giveaways may be good to drive a bit of traffic to your page but those likes are usually people wanting something for free not people who will be willing to put money into something that you are selling.  I have also paid for advertising without much return.  I have taken a few classes and they say that the first 2,000 likes are the hardest and then it gets easier.  (I hope so.)

I teach crochet classes at the local arts center.  This is a great way to connect with other fiber artisans in my community but it also helps build my network.  My students are also people I have test my patterns and help me in the future.  A support system is always a good idea.

I am a member of Handmade Saskatchewan, The Saskatchewan Craft Council and The Crochet Guild of America.  There are many networking opportunities on Etsy and Ravelry.  Connect, get to know people.
Picture
My labels were one of my best purchases to give my items a higher quality.  Many people at craft shows tell me how much they like my labels.  It gives a more polished, professional look to your items.

This is where I have purchased them on Etsy: https://www.etsy.com/ca/shop/UrbanTimberWoodworks

When you list new items on Etsy: share, share, share.  Put it on Facebook, Pinterest, your website.  People need to see that you are still creating.  Ask for feedback, like favorite colors.  I am not a fan of blue, yet that is one of my best selling colors.  It is good information to know.

Always wear your own items when possible.  I get stopped and asked all the time.  Usually it is because people notice my labels, they ask what store I purchased it from.  It is exciting to tell people that it is my own design!

Finances
I use the Square for all my purchases.  This has made keeping track of sales so much easier!  I use it for not only credit card sales but every sale.  It gives me tons of stats about my sales and I have to the option to input what payment, how they paid and to send receipts all from my phone, where ever I am.  I love this! To receive $1,000 free processing fees, sign up HERE.
In conclusion, selling crocheting for a profit is not for everyone.  It takes a lot of work and commitment.  I have had to tell myself over and over again that it is okay that I am crocheting and watching tv in the middle of the day because it is my job.  Sometimes I get tired of crocheting but I know that I have to stick with it.  

I hope that I was able to share a few new things for you, good luck with your endeavor! 

**Please note that I get a ton of requests for personalized evaluations for crochet businesses.  I am not able to spend my family time reviewing them all.  Please take the information that is provided in this post and implement it, work hard at it and make changes as you see how the market reacts.  Each business is an extension of you.  We all have unique talents and gifts - that is what you need to market to be a success.

source: https://web.archive.org/web/20160224183005/http://www.livingskiescrochet.com/blog/how-to-make-money-crocheting

Tutti Frutti Slippers -free crochet pattern-

tuttifrutti

Fresh into a new year, why not try a new crochet technique?!  If you haven't tried the Tunisian entrelac stitch before, here's a great project to get started. The designer has included a video to help you out, which I know helps me greatly when trying something different, that sometimes words alone can be difficult to understand. And the result? A pair of fun crochet slippers!

Designed By: Nadia Fuad

Skill Level: Intermediate

Materials:
  • Red Heart Yarns in Super Saver Colors: Aran, Dark Teal, Flamingo, Hot Coral, and Dark Orchid
  • J- 6.00 mm Crochet Hook
  • Yarn Needle
  • Scissors

----------------------------------